Unity で簡単に2Dゲームを作ることができる Unity Playground アセットを触っていきます。
Camera Follow
説明
Camera Follow スクリプトは、カメラがオブジェクトを追いかけます。
使ってみる
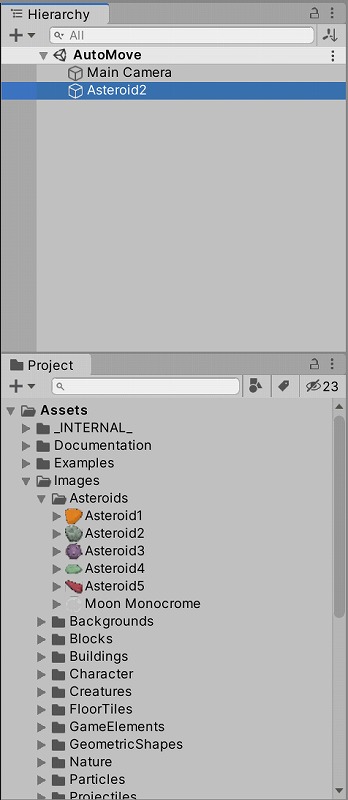
Project ウィンドウの Asteroid2 イメージを Hierarchy ウィンドウにドラッグ&ドロップします。
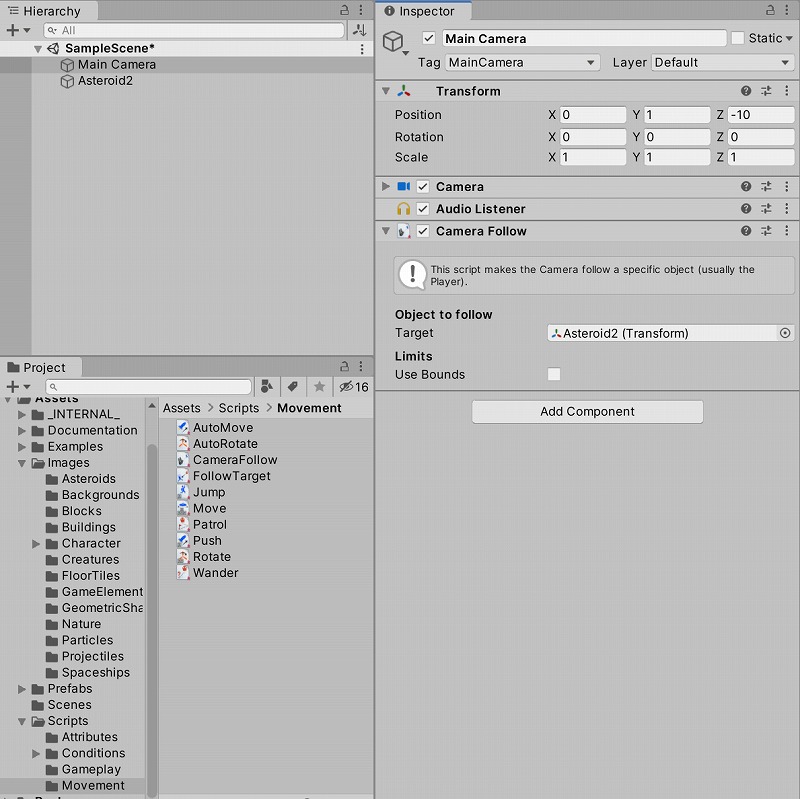
Main Camera に CameraFollow スクリプトをドラッグ&ドロップします。
Target に Asteroid2 を指定します。
Playボタンを押します。
Inspector で Asteroid2 の Position を移動すると、Main Camera が同じ座標に移動します。
スクリプトを見る
CameraFollow スクリプトをダブルクリックすると、ソースコードを見ることができます。
using UnityEngine;
using System.Collections;

[AddComponentMenu("Playground/Movement/Camera Follow")]
public class CameraFollow : MonoBehaviour
{
	[Header("Object to follow")]
	// This is the object that the camera will follow
	public Transform target;

    //Bound camera to limits
    public bool limitBounds = false;
    public float left = -5f;
    public float right = 5f;
    public float bottom = -5f;
    public float top = 5f;

	private Vector3 lerpedPosition;

    private Camera _camera;

    private void Awake() {
        _camera = GetComponent<Camera>();
    }

    // FixedUpdate is called every frame, when the physics are calculated
    void FixedUpdate()
	{
		if(target != null)
		{
			// Find the right position between the camera and the object
			lerpedPosition = Vector3.Lerp(transform.position, target.position, Time.deltaTime * 10f);
			lerpedPosition.z = -10f;
		}
	}


	// LateUpdate is called after all other objects have moved
	void LateUpdate ()
	{
		if(target != null)
		{
			// Move the camera in the position found previously
			transform.position = lerpedPosition;

            // Bounds the camera to the limits (if enabled)
            if(limitBounds) {
                Vector3 bottomLeft = _camera.ScreenToWorldPoint(Vector3.zero);
                Vector3 topRight = _camera.ScreenToWorldPoint(new Vector3(_camera.pixelWidth, _camera.pixelHeight));
                Vector2 screenSize = new Vector2(topRight.x - bottomLeft.x, topRight.y - bottomLeft.y);

                Vector3 boundPosition = transform.position;
                if (boundPosition.x > right - (screenSize.x / 2f)) {
                    boundPosition.x = right - (screenSize.x / 2f);
                }
                if (boundPosition.x < left + (screenSize.x / 2f)) {
                    boundPosition.x = left + (screenSize.x / 2f);
                }

                if (boundPosition.y > top - (screenSize.y / 2f)) {
                    boundPosition.y = top - (screenSize.y / 2f);
                }
                if (boundPosition.y < bottom + (screenSize.y / 2f)) {
                    boundPosition.y = bottom + (screenSize.y / 2f);
                }
                transform.position = boundPosition;
            }
		}
	}
}
↓こちらのメソッドを使用して、カメラをターゲットの座標に線形補完で移動させています。
Vector3.Lerp(Vector3 a, Vector3 b, float t);
Lerp メソッドの使い方は、スクリプトリファレンスを参照しましょう。

Vector3-Lerp - Unity スクリプトリファレンス
Linearly interpolates between two points.
docs.unity3d.com
まとめ
CameraFollow スクリプトは、カメラがオブジェクトを追いかける機能を持っています。
簡単な機能を組み合わせることにより、複雑なことができるようになります。
1個1個使いこなせるようになっていきましょう。


コメント